Twilio SMS
To communicate with your community over SMS you can configure (and purchase) a phone number with Twilio.
Rich text formatting supported: NO
Twilio is a 3rd party cloud communication platform that enables you to send and receive SMS messages to your community. This channel connects a phone number managed by Twilio to your portal.
What you will need to add a Twilio SMS channel
To add a Twilio SMS channel you will need the following:
- a Twilio account. If you don’t already have one you can sign up for their services
- an Confides portal with at least the Admin, Configuration Admin or Super Admin role on the portal
- a place to copy & paste information (a scratchpad like Notepad or TextEdit)
- about 5 minutes of your time
Additional charges may apply.
Setting up a Twilio SMS Number
Step 1: Sign up or sign in to your Twilio Console
You can use these links to either log in or sign up.
Remember, you will need to exit their trial mode before distributing your SMS number to your community.
Step 2: Buy a phone number to receive and send SMS
You will need a phone number to send and receive SMS. Follow the How to Search for and Buy a Twilio Phone Number from Console at Twilio to complete this step. If you already have a phone number you wish to use, we suggest you read the documentation about Porting a Phone Number to Twilio.
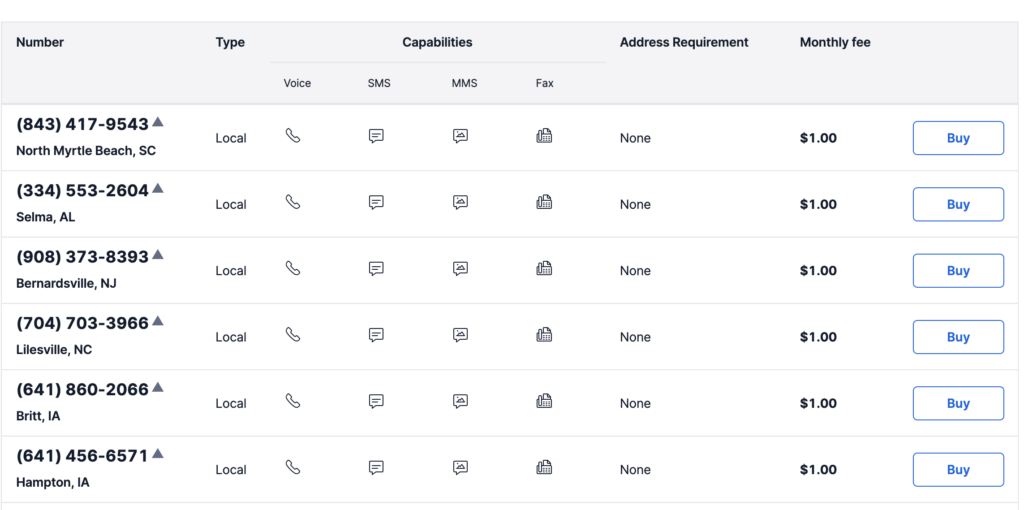
Once you have acquired a phone number, write down (copy it in your notepad) the E.164 format of it (it’s the number that start with a + following by the country code and the phone number itself).
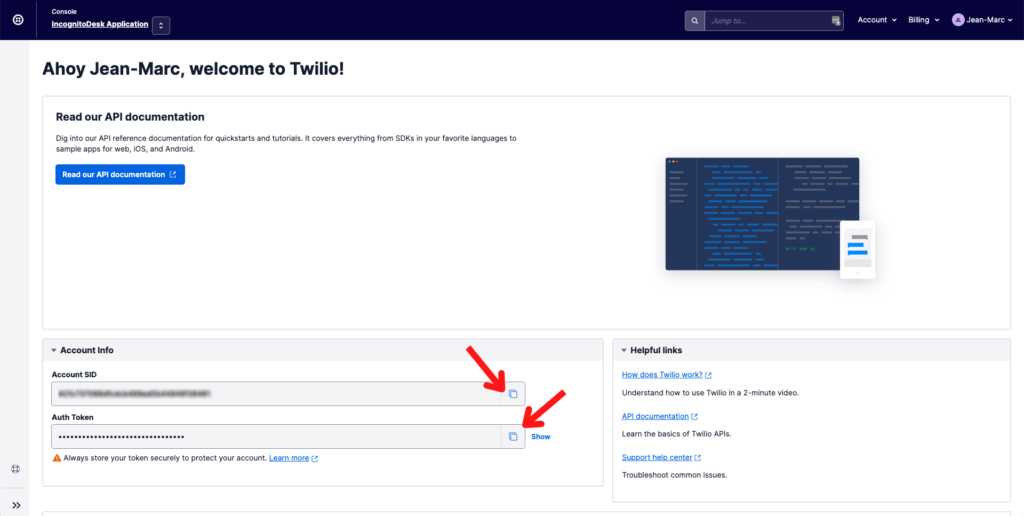
Step 3: Get your Account SID and Auth Token
From your Twilio Console, locate the Account Info section. It will contain the Account SID and Auth Token needed for Confides to communicate with Twilio. Copy the Account SID and Auth Token from the Twilio Console to your scratchpad.
Setting up the Twilio SMS Channel in Confides
Step 1: Log in (if you haven’t already) into your Confides portal
You can use these links to either log in in or sign up.
Step 2: Open the Channel Settings
From the Settings module, navigate to the Channels section.
Step 3: Add a channel
Click the Add a Channel button and select the Twilio SMS channel type.
Step 4: Input the Alias and choose a Privacy Level
Enter the alias for this channel (an alias is a great way to guide your agents on the topic of the channel). Also, choose a privacy level for the channel (remember, the privacy level cannot be changed afterward).
Step 5: Input the Twilio Configuration
Using the information you saved aside while configuring the phone number in Twilio, fill the form to allow Confides to send and receive messages using the SMS number you have selected.
Step 6: Input the other settings of your channel
Use the Away from desk message and the Automated response during a phone call to personalize how Confides should handle these situations.
Step 7: Complete the set up
Click the Add a channel button. Confides will validate and complete the configuration of your number inside of Twilio. If the information is incomplete or invalid, error messages will guide you through the process.
Limitations
We do not currently allow multimedia content through this channel.
Outgoing messages are not limited in size. When an outgoing message exceeds the maximum size for an SMS message, it will be split in multiple, smaller, messages. To avoid splitting we recommend keeping your messages be under 320 characters.
URLs and links can be sent through this channel. URLs longer than 25 characters are automatically shortened by us and replaced by a link that starts with https://go.incog.in/. The shortened URL will redirect to your original URL automatically.